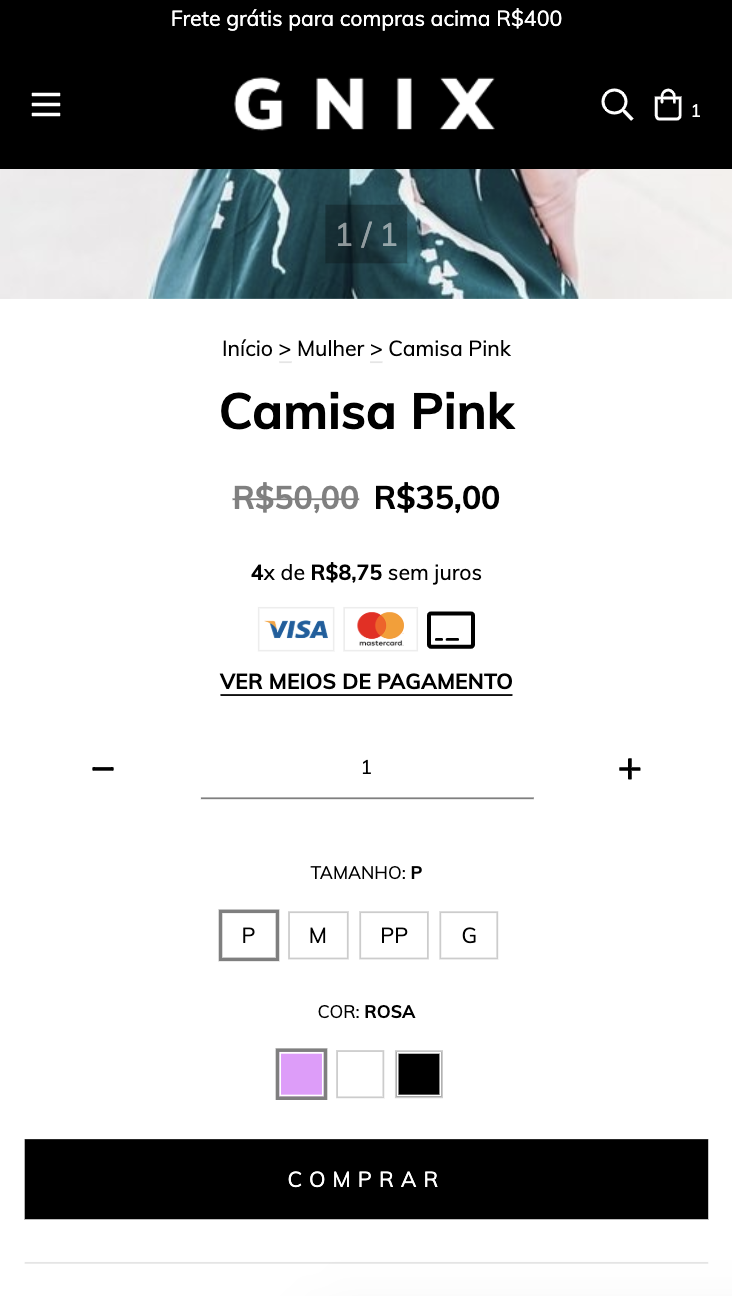
Neste artigo vamos adicionar botões para mostrar as variações:

Esta funcionalidade suporta cores básicas como "azul, verde, vermelho, etc". Caso o produto tenha cores mais personalizadas, como "salmão", em vez de exibir o botão com o fundo dessa cor, o texto com o nome da cor será exibido.
HTML
1. Dentro da pasta snipplets crie outra pasta com o nome product, dentro adicionamos um novo snipplet chamado product-variants.tpl (se você já tem esse snipplet basta substituí-lo) com o seguinte código:
<div class="js-product-variants{% if quickshop %} js-product-quickshop-variants text-left{% endif %} form-row">
    {% set has_size_variations = false %}
    {% if settings.bullet_variants %}
        {% set hidden_variant_select = ' d-none' %}
    {% endif %}
    {% for variation in product.variations %}
        <div class="js-product-variants-group {% if variation.name in ['Color', 'Cor'] %}js-color-variants-container{% endif %} {% if settings.bullet_variants %}col-12 mb-2 text-center {% if not quickshop %}text-md-left{% endif %}{% else %}{% if loop.length == 3 %} {% if quickshop %}col-4{% else %}col-12{% endif %} col-md-4 {% elseif loop.length == 2 %} col-6 {% else %} col {% if quickshop %}col-md-12{% else %}col-md-6{% endif %}{% endif %}{% endif %}" data-variation-id="{{ variation.id }}">
            {% embed "snipplets/forms/form-select.tpl" with{select_label: true, select_label_name: '' ~ variation.name ~ '', select_for: 'variation_' ~ loop.index , select_id: 'variation_' ~ loop.index, select_data_value: 'variation_' ~ loop.index, select_name: 'variation' ~ '[' ~ variation.id ~ ']', select_group_custom_class:hidden_variant_select, select_custom_class: 'js-variation-option js-refresh-installment-data'} %}
                {% block select_options %}
                    {% for option in variation.options %}
                        <option value="{{ option.id }}" {% if product.default_options[variation.id] == option.id %}selected="selected"{% endif %}>{{ option.name }}</option>
                    {% endfor %}
                {% endblock select_options%}
            {% endembed %}
            {% if settings.bullet_variants %}
                    <div class="text-center {% if not quickshop %}text-md-left{% endif %}">
                        <label class="form-label mb-3">{{ variation.name }}</label>
                    </div>
                    <div class="text-center {% if not quickshop %}text-md-left{% endif %}">
                        {% for option in variation.options if option.custom_data %}
                            <a data-option="{{ option.id }}" class="js-insta-variant btn btn-variant{% if product.default_options[variation.id] == option.id %} selected{% endif %}" title="{{ option.name }}" data-option="{{ option.id }}" data-variation-id="{{ variation.id }}">
                                <span class="btn-variant-content"{% if variation.name in ['Color', 'Cor'] %} style="background: {{ option.custom_data }}; border: 1px solid #eee"{% endif %} data-name="{{ option.name }}">
                                {% if not(variation.name in ['Color', 'Cor']) %}
                                    {{ option.name }}
                                {% endif %}
                                </span>
                            </a>
                        {% endfor %}
                        {% for option in variation.options if not option.custom_data %}
                            <a data-option="{{ option.id }}" class="js-insta-variant btn btn-variant{% if product.default_options[variation.id] == option.id %} selected{% endif %}" data-variation-id="{{ variation.id }}">
                                <span class="btn-variant-content" data-name="{{ option.name }}">{{ option.name }}</span>
                            </a>
                        {% endfor %}
                    </div>
            {% endif %}
        </div>
        {% if variation.name in ['Talle', 'Talla', 'Tamanho', 'Size'] %}
            {% set has_size_variations = true %}
        {% endif %}
    {% endfor %}
</div>
2. Temos que criar uma nova pasta com o nome forms, localizados na pasta snipplets. Dentro adicionamos o snipplet com o nome form-select.tpl, que usaremos para todos os componentes “select” dentro do layout (no layout Base ele já está adicionado).
{# /*============================================================================
  #Form select
==============================================================================*/

#Properties

#Group
    //select_group_custom_class for custom CSS classes
#Label
    // select_label_name for name
    // select_label_id for ID
    // select_for for label for
    // select_label_custom_class for custom CSS classes
#Select
    // select_id for id
    // select_name for name
    // select_custom_class for custom CSS classes
    // input_rows for textarea rows
    // select_options to insert select options
    // select_aria_label for aria-label attribute

#}

<div class="form-group {{ select_group_custom_class }}">
    {% if select_label %}
        <label {% if select_label_id%}id="{{ select_label_id }}"{% endif %} class="form-label {{ select_label_custom_class }}" {% if select_for %}for="{{ select_for }}"{% endif %}>{{ select_label_name }}</label>
    {% endif %}
    <select
        {% if select_id %}id="{{ select_id }}"{% endif %}
        class="form-select {{ select_custom_class }} {% if select_inline %}form-control-inline{% endif %}"
        {% if select_data %}data-{{select_data}}="{{select_data_value}}"{% endif %}
        {% if select_name %}name="{{ select_name }}"{% endif %}
        {% if select_aria_label %}aria-label="{{ select_aria_label }}"{% endif %}>
        {% block select_options %}
        {% endblock select_options %}
    </select>
    <div class="form-select-icon">
        {% include "snipplets/svg/chevron-down.tpl" with {svg_custom_class: "icon-inline icon-w-14 icon-lg svg-icon-text"} %}
    </div>
</div>
3. Para a parte do HTML, precisamos adicionar uma pasta SVG dentro da pasta snipplets. Aqui vamos adicionar o SVG que usamos para a seta dentro das variantes selecionadas com o nome chevron-down.tpl
<svg class="{{ svg_custom_class }}" xmlns="http://www.w3.org/2000/svg" viewBox="0 0 448 512"><path d="M441.9 167.3l-19.8-19.8c-4.7-4.7-12.3-4.7-17 0L224 328.2 42.9 147.5c-4.7-4.7-12.3-4.7-17 0L6.1 167.3c-4.7 4.7-4.7 12.3 0 17l209.4 209.4c4.7 4.7 12.3 4.7 17 0l209.4-209.4c4.7-4.7 4.7-12.3 0-17z"/></svg>CSS
Requisito:
Ter adicionado helper classes em seu layout. Você pode seguir este pequeno tutorial para fazer isso (é só copiar e colar algumas classes, não leva mais que 1 minuto).
1. Adicione os estilos no arquivo static/style-colors.scss.tpl
Adicionamos o seguinte SASS de cores em style-colors.scss.tpl (ou no stylesheet do seu layout que possui as cores e fontes da loja). Lembre-se de que as variáveis de cores e fontes podem variar em relação ao seu design:
@mixin prefix($property, $value, $prefixes: ()) {
  @each $prefix in $prefixes {
      #{'-' + $prefix + '-' + $property}: $value;
  }
    #{$property}: $value;
}


{# /* // Buttons */ #}


.btn{
  text-decoration: none;
  text-align: center;
  border: 0;
  cursor: pointer;
  -webkit-appearance: none;
  -moz-appearance: none;
  appearance: none;
  text-transform: uppercase;
  background: none;
  @include prefix(transition, all 0.4s ease, webkit ms moz o);
  &:hover,
  &:focus{
    outline: 0;
    opacity: 0.8;
  }
  &[disabled],
  &[disabled]:hover{
    opacity: 0.5;
    cursor: not-allowed;
    outline: 0;
  }
  &-variant{
    display: inline-block;
    font-size: 10px;
    line-height: 10px;
    min-width: 24px;
    min-height: 24px;
    margin: 0 10px 10px 0;
    border: 1px solid rgba($main-foreground, .3);
    color: rgba($main-foreground, .3);
    border-radius: 2px;
    vertical-align: top;
    &-content{
      display: block;
      min-width: 12px;
      min-height: 12px;
      margin: 5px;
      line-height: 12px;
    }
    &.selected {
      color: $main-foreground;
      border: 1px solid rgba($main-foreground, .8);
    }
  }
}


{# /* // Forms */ #}


input,
textarea {
  font-family: $body-font;
}


.form-control {
  display: block;
  padding: 10px 8px;
  width: 100%;
  border: 0;
  border-bottom: 1px solid rgba($main-foreground, .5);
  -webkit-appearance: none;
  -moz-appearance: none;
  appearance: none;
  color: $main-foreground;
  background-color: $main-background;
  &:focus{
    outline: 0;
  }
  &-inline{
    display: inline;
  }
}


.form-control::-webkit-input-placeholder {
  color: $main-foreground;
}
.form-control:-moz-placeholder {
  color: $main-foreground;
}
.form-control::-moz-placeholder {
  color: $main-foreground;
}
.form-control:-ms-input-placeholder {
  color: $main-foreground;
}


.form-select{
  display: block;
  padding: 10px 0;
  width: 100%;
  border: 0;
  border-bottom: 1px solid rgba($main-foreground, .5);
  border-radius: 0;
  -webkit-appearance: none;
  -moz-appearance: none;
  appearance: none;
  color: $main-foreground;
  background-color: $main-background;
  &-icon{
    background: $main-background;
  }
}
2. Adicione os estilos no arquivo static/style-critical.tpl
Se em seu layout você usa um stylesheet para o CSS crítico, precisaremos adicionar o código abaixo nele, mas se não for o caso, você pode unificar o CSS dos passos 2 e 3 em um único arquivo.
{# /* // Forms */ #}


.form-group {
  position: relative;
  width: 100%;
}
.form-group .form-select-icon{
  position: absolute;
  bottom: 12px;
  right: 0;
  pointer-events: none;
}
.form-row {
  width: auto;
  display: -webkit-box;
  display: -ms-flexbox;
  display: flex;
  -ms-flex-wrap: wrap;
  flex-wrap: wrap;
  margin-right: -5px;
  margin-left: -5px;
  clear: both;
}


.form-row > .col,
.form-row > [class*=col-]{
  padding-right: 5px;
  padding-left: 5px;
}


.form-label {
  display: block;
  font-size: 10px;
  text-transform: uppercase;
}
3. Adicione os estilos no arquivo static/style-async.tpl
Se em seu layout você usar um stylesheet de CSS assíncrono, precisaremos adicionar o seguinte código abaixo, mas se esse não for o caso, você poderá unificar o CSS dos passos 3 e 4 em um único arquivo.
{# /* // Forms */ #}


.form-group{
  .form-label{
    float: left;
    width: 100%;
    margin-bottom: 10px;
  }
  .alert{
    margin: 10px 0 0 0;
  }
}
JS
⚠️ A partir do dia 30 de janeiro de 2023, a biblioteca jQuery será removida do código de nossas lojas, portanto, a função "$" não poderá ser utilizada.
1. O JavaScript precisa ser adicionado no arquivo store.js.tpl (ou onde você tem suas funções JS). Adicionamos o seguinte código:
 {% if settings.bullet_variants %}

    changeVariantButton = function(selector, parentSelector) {
        selector.siblings().removeClass("selected");
        selector.addClass("selected");
        var variation_id = selector.attr('data-variation-id');
        var option_id = selector.attr('data-option');
        var parent = selector.closest(parentSelector);
        var variation_select = parent.find('.js-product-variants-group[data-variation-id="'+variation_id+'"] .js-variation-option');
        var selected_option = variation_select.find('option[value="'+option_id+'"]');
        variation_select.find("option").removeAttr("selected");
        selected_option.attr('selected', 'selected');
        variation_select.trigger('change');
    }

    jQueryNuvem(document).on("click", ".js-insta-variant", function (e) {
        e.preventDefault();
        $this = jQueryNuvem(this);
        changeVariantButton($this, '.js-product-variants-group');
    });

{% endif %}
Configurações
No arquivo config/settings.txt, adicionaremos um input que ativa a funcionalidade na seção "Detalhe do produto".
title
    title = Variantes del producto
checkbox
    name = bullet_variants
    description = Mostrar como botones
Traduções
Por fim, adicionamos os textos para as traduções no arquivo config/translations.txt
es "Variantes del producto"
pt "Variações do produto"
es_mx "Variantes del producto"

es "Mostrar como botones"
pt "Mostrar como botões"
es_mx "Mostrar como botones"

es "Talle"
pt "Tamanho"
en "Size"
es_mx "Talla"

es "S"
pt "P"
en "S"
es_mx "S"

es "M"
pt "M"
en "M"
es_mx "M"

es "L"
pt "G"
en "L"
es_mx "L"

es "XL"
pt "GG"
en "XL"
es_mx "XL"

es "Color"
pt "Cor"
en "Color"
es_mx "Color"

es "Azul"
pt "Azul"
en "Blue"
es_mx "Azul"

es "Blanco"
pt "Branco"
en "White"
es_mx "Blanco"

es "Rojo"
pt "Vermelha"
en "Red"
es_mx "Rojo"

es "Material"
pt "Material"
en "Material"
es_mx "Material"

es "Algodón"
pt "Algodão"
en "Cotton"
es_mx "Algodón"

es "Denim"
pt "Denim"
en "Denim"
es_mx "Denim"
Ativação
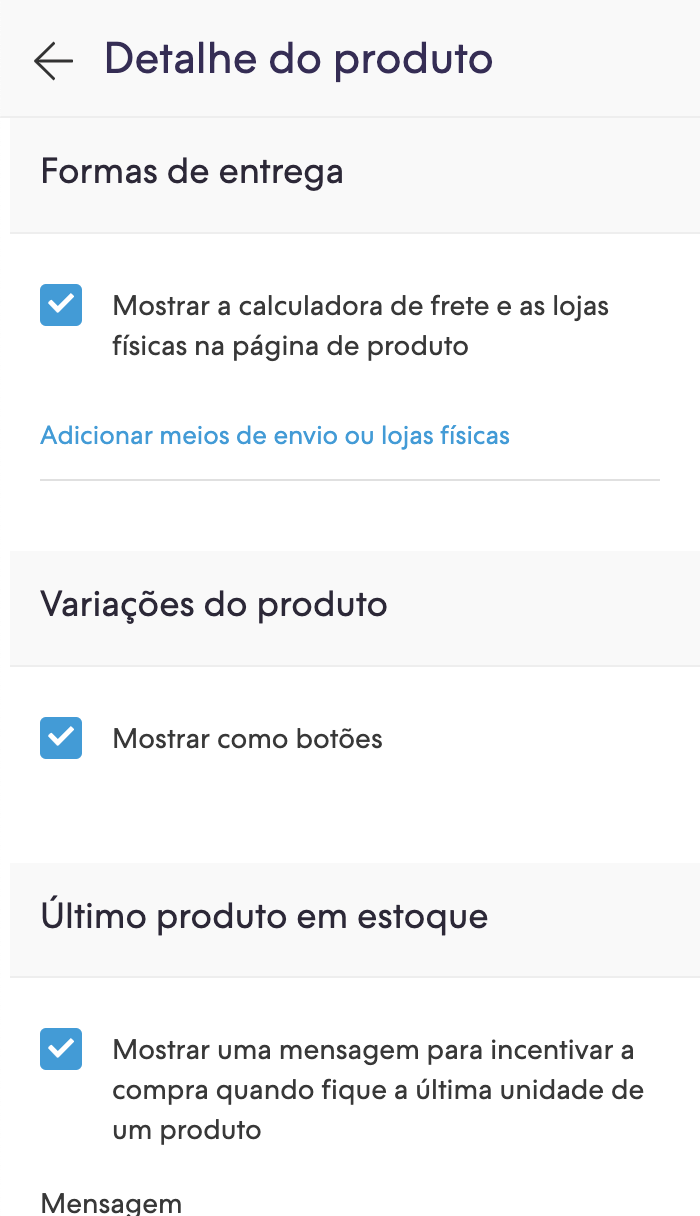
Você pode ativar a funcionalidade no Administrador Nuvem na seção de Personalizar seu layout atual dentro de ‘Detalhe do produto’:

Pronto, você já tem em seu layout a funcionalidade aplicada.